Introduction
A tag checking station is a good way to verify athlete information is correct prior to the event. You can set up the station as a "check line" near the exit to your expo, or have a table with a near field antenna where athletes can "swipe" their bib.

If you don't have a near field antenna, you can order one from ChronoTrack (item ANT-NF-MGR on the order form). You can also use a FlashPoint or threshold antennas for the "swipe" method, but it will require that you reduce the Reader signal power on your controller. Whichever setup you pick, this guide will walk you through the process of setting up your checking station.
If you have an RFID block, check out our guide to setting up a Tag Checking Station using an RFID Block and the Tag Checker software HERE.
Please note that this process only works for pre-assigned bibs.
Setting Up
- Set your controller to Immediate Mode:
• For MiniTrack, select Menu > 3 > 3 > 2 (Pressing 2 or ENTER will toggle Immediate Mode ON/OFF)
• For BoxScore 1.26, select Status > Operations and press the Immediate button to toggle Immediate Mode ON/OFF.
• For BoxScore 3, select Controller > Operations and press the Immediate Mode button to toggle Immediate Mode ON/OFF.
- If you're using a near-field antenna or using a "check line" at the exit to your expo, you can skip this step. Reduce the reader power on your controller. We recommend a level between 12 and 18 dB, but you should experiment with the levels to get it where you want it.
It is important to remember to restore the Reader power settings to their maximum value when you are finished with tag checking.
• For MiniTrack, select Menu 3 > 3 > 1 Low Power. Pressing the Down arrow on the keypad will reduce the power.
• For BoxScore 1.26, select Status > Operations and press the Goto Low Power button and use the minus button to reduce the power to the correct level.
• For BoxScore 3, select Configure > Reader and press the Reader Power button and use the minus button to reduce the power to the correct level.
- Connect the antenna(s) or FlashPoint to the controller.
- Now establish a live connection between your controller and your computer using a LAN cable. If you are unsure how to configure and connect your controller to your computer, see our guide for the PRO CONTROLLER or the MINITRACK.
- Once you have established a connection, open the data in SimpleClient. For CCSLite, double-click a controller line. For GPRS streaming, establish a connection to the CCS Server and locate your session.
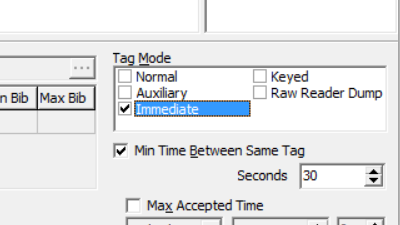
- In the Select Session window, Set Tag Mode to Immediate (make sure Normal is not checked).
- To prevent tags from showing up on the Announcer Display multiple times, use the Minimum Time Between Same Tag feature. 15-30 seconds should be adequate for this purpose.

- Click Select.
- Click File > Load Bib File.

The bib file must be a CSV and can contain any number of information columns. However, the Bib column MUST be the first column in the file. The easiest way to get a Bib File is to download the Standard/Announcer report from your Event in ChronoTrack Live. - Once your Bib File is loaded, click the Play button in the Simple Client window.
- Now click View > Announcer Display. As tags are passed over the antenna, the Announcer Line screen will display the information similar to what's shown below. It's best to connect the computer to a TV instead of displaying it on the laptop screen so that athletes can clearly see the information.
