Introduction
This guide will walk you through the basic functions of BoxScore 1.26 that you will likely use frequently on and before race day including:
- Event and Point Configuration
- Performing a Time Sync
- Setting the Server IP and Connecting
- Using the Point Status Screen
- Creating a Gun Start or Marker
- Using the System Status Screen
- Using the Messages Screen
- Copying Files to a USB Drive
Configuring the Event and Point information on your controller is important for organization of hardware and data. Every time the controller is powered on, and new data file is created. The folder that contains that file will be titled with the Event name on the controller. Each session within the file will be titled with the Point name that was set on the controller at the time the session was created.
Each time BoxScore boots up, you will be asked to determine the Event and Point name. If you do not determine the Event and Point name at that time, the Folder will retain the "old" name, which may cause confusion when attempting to retrieve race data.
To change the Event and/or Point name AFTER the controller has finished its boot-up sequence:
- From the main menu, press Configure > Point
- Tap inside the white box for the field you would like to change.
- Use the text entry screen to define the Event or Point name. Use the Alpha/Num key to toggle between entry modes.

- Press OK to accept the change, and then press Done
Since Controllers collect tag reads based on Time of Day, it's vital to make sure your Controllers are synced to the correct time. Since setting the time on one controller will also sync the time on any networked controllers, it's best to network the Controllers together, either by "daisy-chaining" them together with LAN cables, or powering the WiFi modems on in each of them and then sync them. This will ensure that all controllers are on exactly the same time.
To Perform a Time Sync:
- From the main menu, press System > Time.
- Select one of the two available options:
Current pushes the controller's current time to any other networked controllers when you press the Set Time button.
Manual allows you to type in the Date and Time.
You may also connect the controller to a PC via a LAN cable or the WiFi modem and use the CCS Lite application to sync the time on the controller.
Manual Sync
- After selecting Manual and pressing Enter Time on the Manage Time menu, enter the correct time in [hh]:[mm]:[ss] format. Be sure to insert colons as appropriate.

- When done, touch OK.
- Use the arrow buttons to set the desired date. You can also use a USB keyboard to type in the date or time.
- Touch Set Time to set the time on the controller.
Setting the Server IP and Connecting
In Controller networking terminology, a Server is any external source you would like the Controller to connect to, whether it's the ChronoTrack CCS Server or a PC. Before connecting to either of these sources, you must set the Server address to the appropriate IP to connect correctly. (Click HERE for a Server IP cheat sheet)
To set the Server IP for LAN or WiFi:
- From the Main BoxScore menu select Configure > Network.
- Click the Server IP Address box and enter the IP address you entered in the IPv4 settings of your computer, then click OK and then Apply.

- On your computer, open the CCSLite Application.
- Click the Connect button on the main screen of BoxScore to establish the connection. You should see that the connection is “Working” on the main BoxScore screen.
If you are connecting to the ChronoTrack Server via a cellular connection, follow the steps HERE.
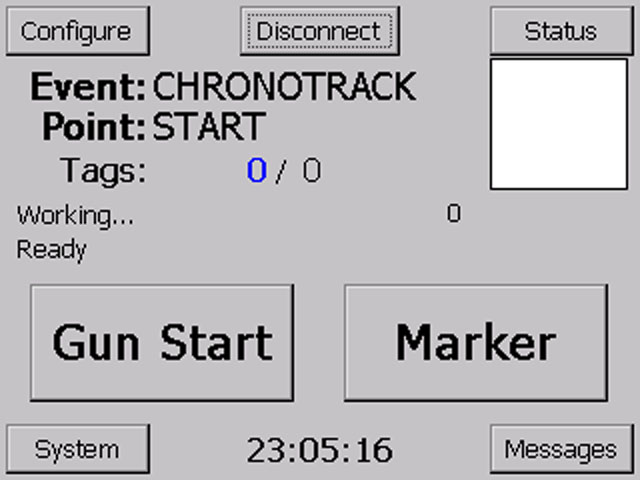
It is usually beneficial to check the Point Status screen to ensure that your antennas are properly connected. The screen will display the connection status of each Port on the reader(s) on the right side of the screen. OK indicates that an antenna is connected. A line indicates no antenna connected.
Creating a Gun Start or Marker
A Gun Start creates a time stamp within the file, but does not affect the file itself in any way. Creating a Marker, however, will segment the controller's current data file and create a new 'Session' of data. Any tag reads that were collected prior to the marker will be isolated from any tag reads that are collected after the marker. This is useful for scenarios such as Wave starts or when a controller is being used at multiple Points. Changing the Point name on a controller will automatically create a Marker.
To Create a Gun Start time stamp or a Marker, simply press the corresponding button on the main screen. The Marker/Gun Start command will only be recorded when you release the button. Pressing and holding will not send the command.
Using the System Status Screen
Using the System Status screen, you can view percentage of remaining power for each battery housed in the Controller. 
To access this screen, press Status > System. Keeping an eye on the battery levels of your Controller is very useful for ensuring that you're not suprised by a dead controller on race day.
Sometimes during your race, the controller may experience an event or error that causes it to start beeping and flashing red lights. To view and acknowledge any alerts that arise, press the Messages button in the lower right corner of the main screen. From this screen, you can acknowledge alerts to silence the beep by pressing the OK button. You can also view the time at which any Gun Start time stamp or Marker was created. By pressing any 'Gun' or 'Marker' entries.

After your race is over, we suggest that you extract the race data from the controller via USB, even if you were live-streaming the data from the controller via Cellular or other means. Having a copy for your records is a good data management practice.
To Remove Data from a Controller with a USB Drive:
- Insert a USB drive into one of the USB ports on the Controller.
- From the main screen of BoxScore, press Configure > File
- Confirm that the status line in the lower left corner states “Ready to Copy”. If the status line does not display “Ready to Copy”, try removing and re-inserting the drive. If it still does not say Ready to Copy, try a different drive.

- To copy all the files stored on the controller, select ALL.
- To copy only a selected file, tap the file you would like to copy in the pane on the left, then press To USB.
- To copy the currently active file, press Copy Current. - Make sure to wait until you no longer see "Copying File..." before removing the USB drive.
On race day, you will likely use the Copy Current option. If you have powered the controller off since collecting the race data, the file containing the race data will no longer be the current file - you must select the correct file to copy. Files are named by the date and time they were created in the format MMDDHHMM