Introduction
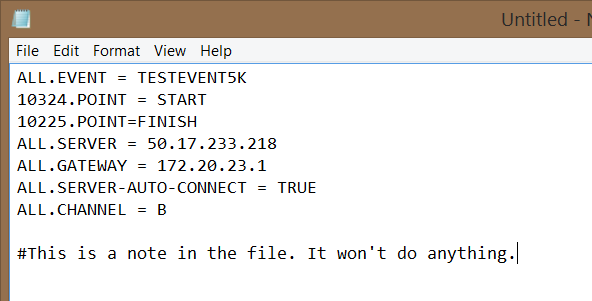
Using a .ini file to configure multiple controllers quickly can drastically reduce headache during race prep. The example image in step 4 below shows a file that could be used to configure 3 different controllers.
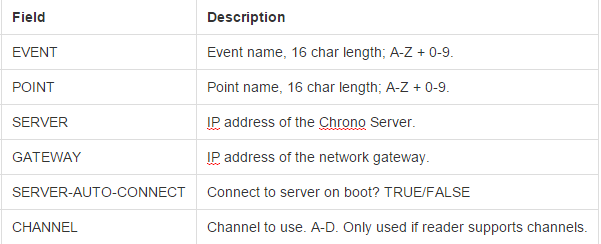
Below, you will find a list of settings that can be altered on your Controller using a .ini file and a USB drive. Some of these settings can be changed using the user interface of the controller, depending on the firmware version.
The items that can be altered are:
If you want to return a setting to its default value, leave the space after the = sign blank, OR type "default" (all lower case without the quotes).
You may return ALL settings on the Controller to their default values by inserting a USB drive with a blank .ini file into the controller and then powering it on.
Setting Up a New .ini File
To set up the file:
- On your computer, open Notepad or another text editor.
- Type the event name in this configuration: XXXXX.YYYYY = ZZZZ
To save time and effort, you may create a file that references multiple Controller serial numbers if you need to enact changes to specific controllers without creating a separate .ini file for each one. (See the example below)
Configurations will NOT be transmitted to networked controllers. The CtrlCfg.ini file must be introduced to each controller individually. - XXXXX should be the 4-5 digit serial number of your controller. You can also specify ALL to set the values for any controller the .ini file is introduced to. A file may contain commands for multiple individual controllers. (See the example below)
YYYYY should be the Field you would like to alter.
ZZZZZ should be the Command or Number that affects that field. (IP address, YES/NO, default, etc.)
Values must be in ALL CAPS. Spacing is not necessary between elements - notice the FINISH point in the example below. - You can also add notes to the file by preceding the note with the # symbol.
Example:
- Save the file on your computer as CtrlCfg.ini
- You will need to select 'All Files' in the Save as type field.

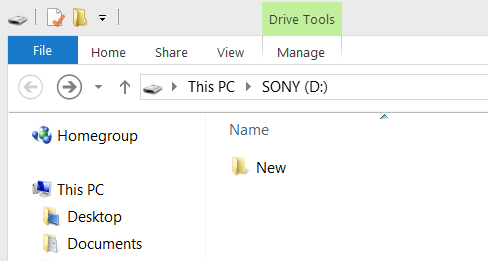
- Now place this file in a folder titled New and place the folder in the root directory of a blank USB drive. We recommend a drive no larger than 2 GB.

Loading the INI File
For controllers running firmware version 7.06.01.00 or higher, power your MiniTrack on, insert the URB drive, and press Menu > 3 > 5 > 1 to set load the INI file. The changes should now be in effect.
For versions lower than 7.06.01.00, ensure that your MiniTrack is powered off, then insert the USB drive and power it on. Once the MiniTrack completes its boot sequence, the changes should be in effect.