Introduction
If you purchased your RFID Block after June of 2014, you may not need to manually install a driver. To test automatic compatibility with your system, plug the RFID block into your computer and open a program such as TagChecker. If TagChecker shows 'Ready' in the lower left hand corner of the window, your RFID block is ready to use. If it does not show 'Ready', try unplugging the RFID block and then plugging it in again.
If it still does not work, complete the process below.
Your PC will reboot during this procedure. You may want to bookmark or print this guide so it can be easily referenced after the PC reboots.
- First, download the RF2400 Driver Win 7 (32-64 Bit) zipped folder in the Downloads section at the end of this article. Do not run or open it.
- Copy the file to Documents/ChronoTrack
- From Windows 8.1, open the “Charms Bar” by pressing Windows key + c or move your mouse cursor to the upper right part on the screen and select Settings.
- In lower portion of menu, select Change PC Settings (PC settings form opens)

- From PC settings form, choose Update & Recovery

- Click the Recovery option

- Once selected, you will see an advanced startup section appear on the right hand side. Click Restart Now under the Advanced Startup section.

- Your computer will reboot and Choose an Option will appear, click on Troubleshoot

- Advanced options will appear, select Startup Settings

- Click Restart

- The computer will reboot and Startup Settings will display. Press the F7 key on your keyboard to Disable driver signature enforcement

- Your computer will again reboot.
- Login to your PC as normal.
- Now locate the .zip folder you downloaded earlier.
- Right click on file and select Extract All. It should extract to folder RF2400 Driver Win 7 (32-64 Bit).
- Plug the RFID Block into your PC. The PC may appear to do nothing. However the following message may appear. If so, click the Close button.

- Move your mouse cursor to the upper right corner of your screen or press Windows key + C to show the charms bar.
- Select Search.
- In the search box, enter Control Panel. The Control Panel link should appear on left. Click to open.
- Change "View by:" to Small Icons, then select Device Manager.
- You should get a list of devices and under Other Devices, should be a listing similar to this:

- Right click on USB < - > RF1200 and select Update Driver Software... The following form should open. Select Browse my computer for driver software.

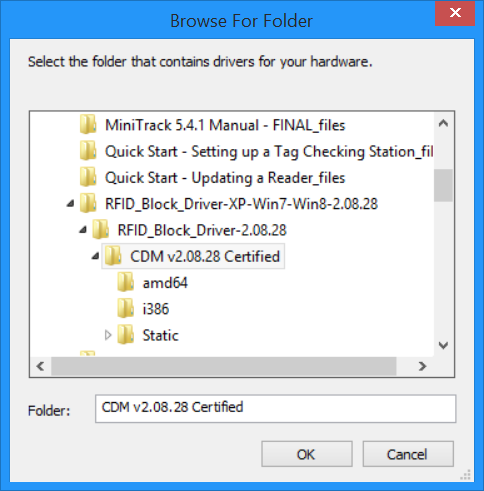
- Navigate to the folder you extracted earlier, open it, and select folder CDM v2.08.28 Certified.

- Click OK, then following form should appear. Click Next.

- Windows should begin installation and a progress bar should appear, followed by the following message. Click Install this driver anyway.

- The progress bar should continue, and then you should get the following. Click the Close button.

At the same time, a message may appear at the bottom stating the hardware failed to install. Click Ok on this message. - Now the Device Manager form should have a new Other device. However, you should still see a 'USB Serial Port' entry listed under Other Devices.

- Right click on USB Serial Port entry in the Other Devices section, select Update Driver Software, and repeat steps 22-26.
- Once installed, the following should appear

- Click the Close button.
- Now a new list of devices should appear. Note ENSYC USB Serial Port and Ensyc USB Serial Converter under the Ports (COM & LPT) and Universal Serial Bus Controllers groupings.

- Close the Device Manager form and the RFID Block should be ready to work with any of the RFID Block software (PrintDTag, Tag Checker, MiniTagReader, MiniTagWriter).