Introduction
This guide will walk you through the basic functions of ChronOS that you will likely use frequently on and before race day including:
- Event and Point Configuration
- Performing a Time Sync
- Setting the Server IP and Connecting
- Creating a Gun Start or Marker
- Monitoring Battery and Port Status
- Viewing Live Tags
- Using the Notifications Screen
- Copying Files to a USB Drive
These items are arranged in the order that they should be used on race day, and you can use this guide as a general walkthrough for running a simple race, from a controller perspective.
Setting Event and Point information on your controllers is a good way to keep controllers and their data organized and distinct to avoid confusion that may lead to streaming the wrong data to an Event or Point within CT Live or other scoring software.
Remember that changing the Event OR Point name on a Pro controller will create a new Session of data. You should never change the event or point name while athletes are crossing the timing lines unless your intention is to create a new data session. For more on Sessions and data files, click HERE.
Set Event and Point
- From the main screen of ChronOS, tap either the Event or Point name. This will take you to the Race Ops > Controller menu.

- Tap the Event name or Point name to change it. You can save a little time by tapping the X next to the Event or Point name fields which will clear out the existing values, allowing you to immediately start typing in the new values. You can also tap the button with the ellipsis points to choose 'START', 'FINISH', or a previously-used value as the Point name.

- A keyboard will appear with the Event or Point name at the top. Use the keyboard to change the name to the desired value, then click Save to the right of the space bar. The change will go into effect immediately.
NEVER include a space in an Event or Point name.


Since Controllers collect tag reads based on Time of Day, it's vital to make sure your Controllers are all synced to the correct time. Since setting the time on one controller will also sync the time on any networked controllers, it's best to network the Controllers together, either by "daisy-chaining" them together with LAN cables, or powering the WiFi modems on in each of them and then syncing them. This will ensure that all controllers are on exactly the same time.
To Perform a Time Sync using ChronOS:
Manual Sync
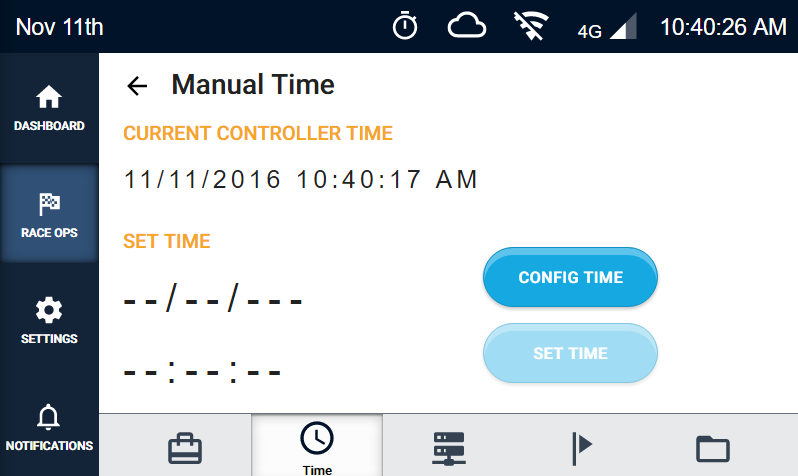
- On the main screen of ChronOS, tap the time display. This will take you to the Race Ops > Time screen.

- Tap the Manual Time option, then tap Config Time on the next screen.

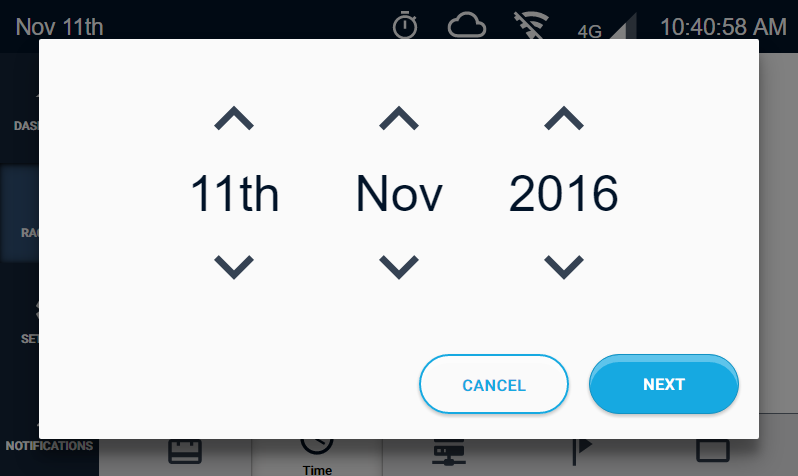
- Use the arrows to adjust the Day, Month, and Year values to the correct date, then click Next.

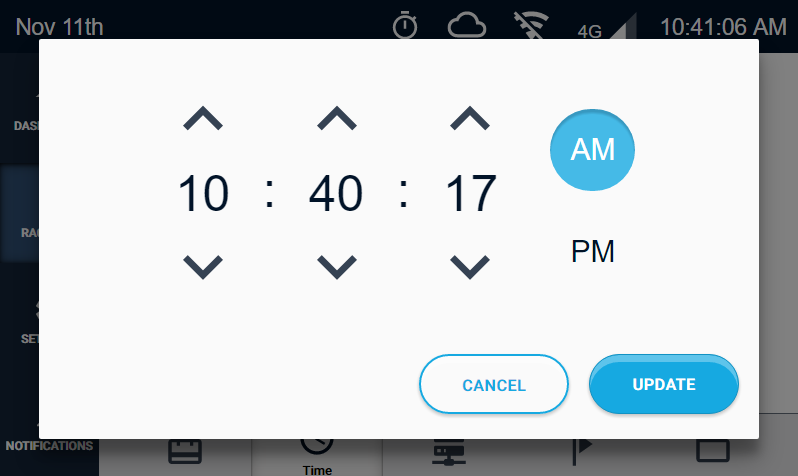
- On the next screen, use the arrows to set the hour, minute, and second values. Select AM or PM as well, then click Update.

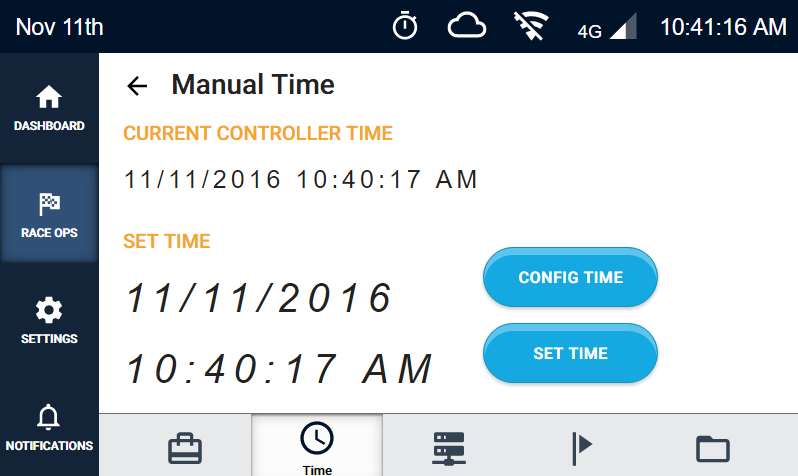
- Now, to finalize the manual time sync, press the Set Time button. The LED marquee should flash between red and green and the status bar along the top of the screen should flash red to indicate a successful sync.

ChronoSync
A ChronoSync is a USB device manufactured by ChronoTrack that contains an high-precision clock that is accurate to the second for 3 days after setting its time.
Please note that a ChronoSync is only compatible with Pro2, BoxScore 3, and MiniTracks running firmware version 5.3.8 or higher.
- First, ensure that your ChronoSync has been synced through ChronoSync Time Manager.
- On the main screen of ChronOS, tap the clock display in the middle of the screen. This will take you to the Race Ops > Time menu.

- Select ChronoSync.

- Insert the ChronoSync into one of the controller's USB ports. After a few seconds, the ChronoSync Time should appear below the Current Controller Time, as shown here. If the ChronoSync hangs on "Initializing" for more than thirty seconds, remove the ChronoSync and re-insert it into a different USB port.

- Click the up arrow on the left to pass the time from the ChronoSync to the controller. A green message will confirm the time set, the status bar along the top of the screen will flash, and the LED marquee will flash between red and green to indicate a successful sync. Verify that the ChronoSync Time and the Controller Time match, then remove the ChronoSync.

Selecting the Server Type and Connecting
In Controller networking terminology, a Server is any external device or site you would like the Controller to connect to, whether it's the ChronoTrack CCS Server or a PC. This guide will focus on connecting via LAN. However, before connecting to either of these sources, you must set the Server address to the appropriate IP to connect correctly.
To connect the controller to a PC via LAN:
- On your PC open CCS Lite OR Fusion.
- From any screen in ChronOS, tap the Race Ops screen, then tap Server Connection.

- On the Server Connection screen, tap the connection you've set up for ethernet and then tap Connect. If you haven't added a local Server Connection yet, click HERE to find out how. Make sure the IP you set on your PC matches the IP you select in the Server Connection.

- After a few seconds, the connection should be established, and the Status field will say "Connected". You should also see the green "Connected" LED on the keypad lit solid.

- In CCSLite/Fusion, confirm that you can see the controller you've connected.
Now, you can stream data to your CT Live Event using Fusion or SimpleClient.
If you are connecting to the ChronoTrack Server via a cellular connection, follow the steps HERE.
Creating a Gun Start or Marker
Gun Starts are time stamps in the data that you can use to sort and filter tag reads and use to determine the actual start time of you race. Gun Starts do not affect the structure of data files in any way.
Markers are the separating line between separate Sessions of data in a data file. Creating a marker separates the reads that were collected before the marker from those collected after. This is useful for scenarios such as when there is a common Start and Finish line.
Changing the Point name on a controller will automatically create a Marker.
To Create a Gun Start time stamp or a Marker:
- From the home screen of ChronOS, press either the Gun Start or Marker panel. This will take you to the Race Ops > Tags and Markers > Markers screen.

- On the next screen, tap the type of Marker you'd like to create, whether Gun Start, Manual, or Zero Counts.

- Now, you can turn Clear Counts on or off depending on whether or not you'd like to zero out the tag counts on the main screen of ChronOS when you create the Marker/Gun Start.
If you'd just like to Zero Counts on the controller without creating a new data session, select Zero Counts and click Create Marker.
You can also click Change next to the Send To field to determine whether the Marker will be sent to All Networked controllers, only controllers that share the same Point name ("This Point Only"), or only the controller you're using ("This Controller Only").

- When you're ready, click Create Marker. A message will appear at the bottom of the screen indicating success and the type of Marker created.

- The main screen of ChronOS will show the last Marker and Gun Start created. You can view all created Markers and Gun Starts from the Notifications menu as well.
Monitoring Battery and Port Status
During the race, it's a good idea to keep an eye on your battery status and the status of your antenna ports. Both of these aspects have status LEDs that allow you to see their status at a glance.
If the LED light above each port that has an antenna connected is lit, then you know the controller is able to send signal through the antenna. If you notice one of the lights turn off during the race, it may be because a cable has come loose from the controller port, or from the antenna.

The battery LED lights will show whether a battery is 'Ready' or 'In Use'. Batteries drain in sequence from A to E. The Home screen will also give a rough indication of the level of charge that each battery has. As a general rule, when battery D is in use, you should consider swapping in fresh batteries before the controller switches to battery E.

The Home screen of ChronOS will show you the last five tags that have been read by the controller, and it's a good way to visually see that athletes are being read and quickly respond if someone doesn't get a read.
The Recent Tags section will only display the Tag number, so if the bib and tag numbers are different, this may not be useful.

Using the Notifications Screen
Sometimes during your race, the controller may experience an event or error that causes it to start beeping and turn the marquee LEDs red. To view and acknowledge any alerts that arise, press the orange icon that takes the place of the Notifications icon when the error occurs.

From this screen, you can acknowledge alerts to silence the beep by pressing the Acknowledge All button.
You can also use this screen to review the time at which any Gun Start time stamps or Markers were created.
After your race is over, we suggest that you extract the race data from the controller via USB, even if you were live-streaming the data from the controller via Cellular or other means. Having a copy for your records is a good data management practice.
To Remove Data from a Controller with a USB Drive:
- From any screen in ChronOS, press the Race Ops menu, then tap the File Management option.

- Insert a USB drive into one of the Pro2's USB ports. Once the controller has recognized the USB drive, press Select Active Files, then press Copy Files.

- A progress bar will appear on the screen as the files are copied. When the bar reaches 100%, the window will close and you can remove the USB drive from the controller.