Introduction
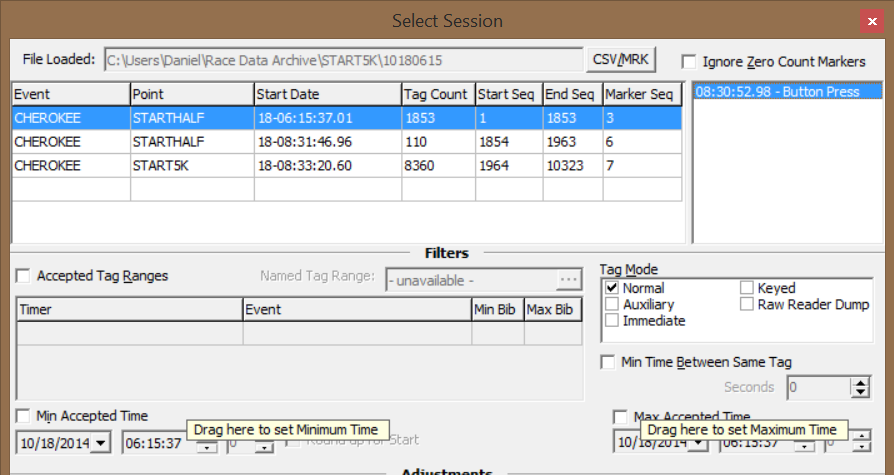
Once a Controller data file is open in SimpleClient or a Controller has been connected to the computer via LAN, WiFi, or the CCS Server you are ready to start working to select, modify, and stream the data. The Session selection window of SimpleClient has been arranged into 3 sections: Session Selection, Filters, and Adjustments.
For more on how to connect your Controller to the Server or a computer, check out our guides for the Pro2, Pro Series, or MiniTrack
Bear in mind that not all of these features are commonly used on Race Day. At its simplest, selecting Session data entails: clicking the correct session, applying a Gun Start as the Min Accepted Time (if a start), changing the Event and Point name, and clicking Select.
Session Selection Panel
This area shows the available sessions on the loaded controller file. A single CSV may contain multiple sessions if a marker was created or the Point Name was changed on the controller during the race. These occurrences are stored on the .MRK file. When a marker is created in a data file, a new session begins, which means that the data collected before and after the marker are segmented into separate sessions, as shown above.
Gun Start Panel
To the right of the Session Selection Panel, the available Gun Start times are displayed. Unlike Markers, a gun start is only a time stamp which means you can have multiple gun times within a single session. This is useful for scenarios such as Wave Starts. Gun times may also be used in conjunction with the Min/Max Accepted Time and Time Shift features.
Above the Gun Starts field is the Ignore Zero Count Markers check box. This can be used if you would like to ignore any Zero Counts commands used on the controller during the session.
CSV/MRK
To the left of the Zero Counts check box is the CSV/MRK button. Clicking this button shows raw tag and controller info. This is mainly used for troubleshooting purposes.
- The CSV tab shows bib, timer and event codes, times, and other information from the reader.
- The MRK tab shows event details from the controller such as: event and point name changes, gun times, and markers.
The Filters section of the Select Session window contains the Accepted Tag Ranges, Tag Mode, and Minimum and Maximum Accepted Time filters.
Accepted Tag Ranges
- Accepted Tag Ranges are set in the Filter section of the session window. This filter helps prevent errant reads from participants wearing old tags by sorting timing data based on event and timer numbers to define valid tags.
Example: An athlete with tag number 7 is carrying an old tag in his pocket from a race he ran the week before. The tag in his pocket is encoded with the number 10, but an athlete in the current race also has tag number 10. To prevent athlete number 7 from accidentally giving athlete number 10 errant reads, the Accepted Tag Ranges filter can determine which tag is valid and which is not based on the event and timer numbers encoded on the tags.
- To use this feature, check the Accepted Tag Ranges check box. The Select Tag Range window will appear. This provides the ability to add, change, or delete tag ranges. For more on this, see Setting Accepted Tag Ranges for SimpleClient
Minimum/Maximum Accepted Time
- The Min Accepted Time feature will filter out all tag reads recorded before the selected time. To use the gun time, drag the correct gun time from the Gun Start field into the Min Accepted time area. This will make all tag reads taken before the gun time invalid.

Note: It is recommended to always use the Round Up for Start feature. If a runner is read just before the gun time, but not after, this will round up the last available read within 6 seconds before the gun time.
Next to the Min Accepted Time field is the Round Up for Start checkbox. This is a particularly useful feature that we always recommend you use when streaming Start data. When you check the Round Up for Start button, the SimpleClient software will examine the reads collected. If a tag is read prior to the Gun Time, but no tag read is found for that tag number after the Gun Time, SimpleClient will round the times before the Gun Start to be equal to the Gun Time.
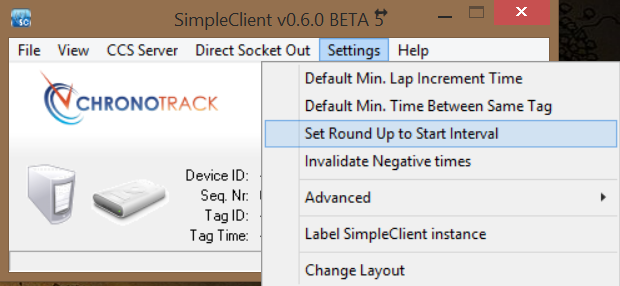
You can adjust the time for this feature through the settings menu. It is set to 6 seconds by default.
- Conversely, the Max Accepted Time feature will filter out all reads recorded after the selected time.
Tag Modes
Controllers are capable of capturing reads in different modes. Data can be filtered by the mode with which it was collected. (e.g. Normal reads collected by antennas versus reads keyed in with a USB keyboard)
- Normal Mode is always enabled unless toggled off and filters the data to include only reads collected via an antenna or Flash Point.
- Immediate Mode is typically used for an Announcer Line. This mode filters the data to include only the first read picked up by an antenna or Flash Point so that an announcer can see who is approaching the finish as early as possible.
Note: For more information about using an announcer line, see the guide on Announcer Line Setup
- Auxiliary is used when the data being processed came from a controller that has been configured to record A-Transactions.
- Keyed Mode filters the data to include only reads entered manually using a USB keyboard or number pad.
- Raw Reader Dump is used when performing a Raw Reader Dump on a controller that has become unresponsive.
Minimum Time Between Same Tag
This feature filters data to exclude tag reads that occur within a specific time frame after the previous read for the same tag.
- This feature can be used to help keep the Announcer Screen queue clear by limiting how often an athlete can be read and therefore how often they appear in the queue.
- This feature may also be used to avoid errant reads collected as a result of one timing point being too near another.
Session Adjustments
The Adjustments section of the Select Session window contains the Rename Event, Rename Point, Tag Prefix Offsets, Time Shift, Minimum Lap Increment Time, and Virtual Point adjustments.
Renaming Event/Point
MiniTrack Controllers with firmware 5.4.1 or higher and Pro Series Controllers allow you to set event and point names. On the controller, these are mainly used for organizational purposes. When sending data through SimpleClient, however, these may be required to match settings in your scoring software.
In the case of a CT Live event, the even name must ALWAYS be EVENTXXXXX where XXXXX is your Event Number. The Point name must be the Timing Device in CT Live to which the data will be streamed. See the example below.
To Change the Event/Point Names: Check the Rename boxes, then add the desired names into the fields below.
Tag Prefix Offsets
Tag Prefix Offsets can be used to pair bibs and tags whose numbers don’t match.
Example 1: An event director would like the 300 athletes in the race to have bib numbers from 1-300, but the tags you have available are encoded with numbers 200-500. You can use the Tag Prefix Offset feature to designate that bibs 1-300 are to correspond to tag numbers 200-500.
Example 2: An event director would like the males’ and females’ bibs to be organized as M1-50 and F1-50. Since tags can’t be encoded with letters, and athletes in the same race can’t have the same bib number, this feature will enable you to designate bibs M1-50 as tag numbers 1-50 and bibs F1-50 as tag numbers 51-100.
- To use this feature, check the Tag Prefix Offsets button and then click the ... button to open the Manage Bib Prefixes window. From here you can add, delete, or update the offsets.
- To add a letter prefix to a designated tag number range, enter the letter in the Number Prefix field and then specify the tag range to which the prefix should be applied.
- To increase a range of Tag numbers, place a + symbol in the Number Prefix field, then specify the tag range to which the addition should apply. Finally, enter the number by which the tag numbers should be shifted into the Tagcode Offset field.
- To decrease a range of Tag numbers, place a - symbol in the Number Prefix field, then enter the range to which you would like the tags to be shifted. For example, if you would like tags 100-120 to be shifted backward 30 places, you would enter 70 and 90 in the Start and End fields respectively. Finally, put the amount by which the tags should be shifted into the Tagcode Offset field.
Time Shift
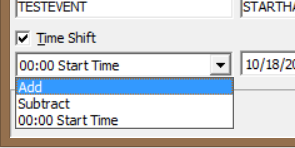
Time Shift allows users to add or subtract from all timestamps in a file. It is used to correct timing errors or convert time of day to race time for some scoring software. Race time will set the start time to 0:00. CT Live only uses time of day.
You can also use the Time Shift feature to Add or Subtract the specified time from all reads and events within a session.
Minimum Lap Increment Time
Minimum Lap Increment Time increases lap count by 1 after the specified time has passed and can be utilized in conjunction with the Virtual Points feature for use with lapped races using only one timing line.
- To use this feature, click the checkbox and enter the time in seconds.
Playing Data
Once you have applied all necessary Filters and Adjustments to your session, click Select. The Select Session window will close and you will return to the main SimpleClient window. To process and stream the session data, click the Play button.