Introduction
This guide will walk you through the process of connecting a Pro Controller to a PC via the Controller's built-in WiFi modem. This guide pertains only to Windows 8 and 10. For a guide for Windows 7, click HERE.
Because the wireless network picker in Windows 8 and 10 does not allow connections ad-hoc networks, connecting must be done "by hand".
We do not recommend this connection method for Windows 8/10. If you're within WiFi range of the controller, you would be better-served using a hard LAN connection.
Connect a Pro to a PC Via Ethernet
General Setup
- Turn on both the PC and the Controller.
- Ensure that the WiFi modem in your Pro controller is powered on.
- Ensure that Classic Data Suite is installed on your computer and it is allowed through the Windows Firewall. (For more on this, see Add a Firewall Exception for CCS Lite)
Connect to the ChronoTrack Ad-hoc Network
- Navigate to Control Panel > Network and Internet > Network and Sharing Center.
- Click Set up a new connection or network

- Double click Manually connect to a wireless network

- Enter the following information for the network:
Network Name = ChronoTrack
Security Type = WEP
Encryption Type = WEP
Security Key = T***TS******N (This password is partially hidden for security reasons. If you do not already know this password, please contact ChronoTrack support) - UN-check the 'Start this connection automatically' check box, then click Next.

- You should see the confirmation shown below. Close the window.

- Now press the Windows key on your keyboard to open the Start screen.
- Type CMD and you should see a search pane appear on the right side with the Command Prompt application listed.
- Right click Command Prompt and click Run as administrator

- In the Command Prompt window, type netsh wlan show networks and press enter.
- You should see a list of available WiFi networks. Locate the ChronoTrack network to verify that it is showing up correctly.
- Now type "netsh wlan set profileparameter name=ChronoTrack ConnectionType=IBSS" (without the quotes) and press Enter. This is case sensitive! If you like, you can copy the text above, right-click in the command Prompt Window and select paste to copy it directly.
- You should see the following success message: "Profile "ChronoTrack" on interface "Wi-Fi" updated successfully."

- Now enter "netsh wlan connect name=ChronoTrack" without the quotes and press Enter. This is case sensitive.
- You should see the following success message: "Connection request was completed successfully."

- To verify that the connection was completed successfully in Windows 8, navigate to Control Panel > Network and Internet > Network and Sharing Center > Change Adapter Settings and look for "ChronoTrack" under your WiFi connection.

In Windows 10, you may not see the connection appear as shown above. However, if you look at the Network and Sharing Center window, you should see the ChronoTrack network appear.
It may take a couple minutes for the connection to be fully established. Please be patient while your computer connects.
- Navigate to Control Panel > Network and Internet > Network and Sharing Center
- In the window that opens, select Change adapter settings on the right side of the window.

- Locate the correct WiFi adapter. Right click on the entry and select Properties.

- In the window that appears, select the Internet Protocol Version 4 (TCP/IPv4) entry and click
- Click the Use the Following IP address radio button.

- Enter the information as follows:
IP: 192.168.0.x (x = any number between 2 and 49)
Subnet Mask: 255.255.255.0
You may leave all other fields blank.
It is important that you remember this number as it will be used later while configuring the controller. - Click OK.
- From the Main BoxScore menu select Configure > Network.
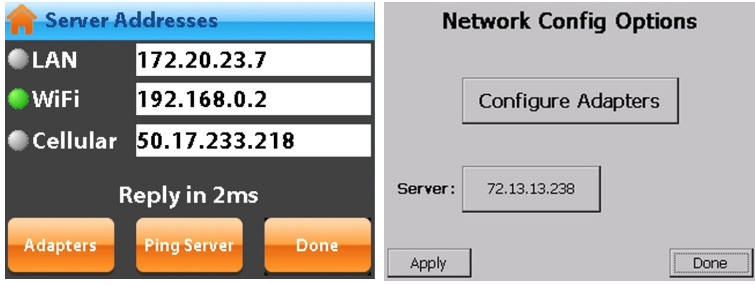
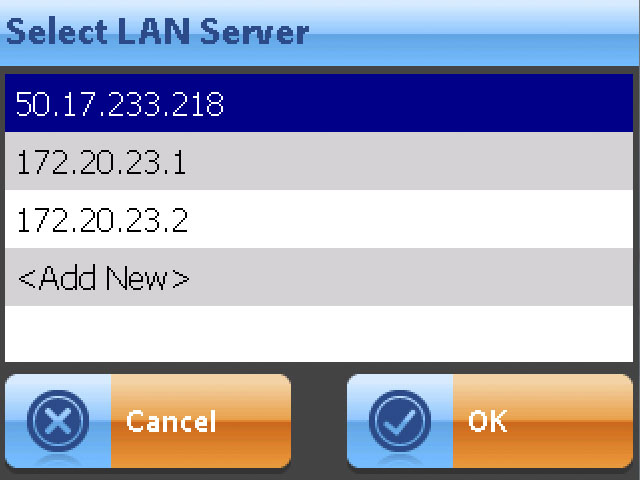
- For BoxScore 3, set the WiFi server address to the IP address you entered in the IPv4 settings of your computer. If the IP is not in the address list, add and select it. (The below example shows LAN Server IP selection, but it is identical to the WiFi selection)
- For BoxScore 1.26, click the Server IP Address box and enter the IP address you entered in the IPv4 settings of your computer, then click OK and then Apply.
- Click Done
Remember to ensure that the WiFi adapter is powered on in Configure > Power.
Establishing the Connection
BoxScore 1.26
- On your computer, open CCSLite.
- Click the Connect button on the main screen of BoxScore to establish the connection. You should see that the connection is “Working” on the main BoxScore screen.
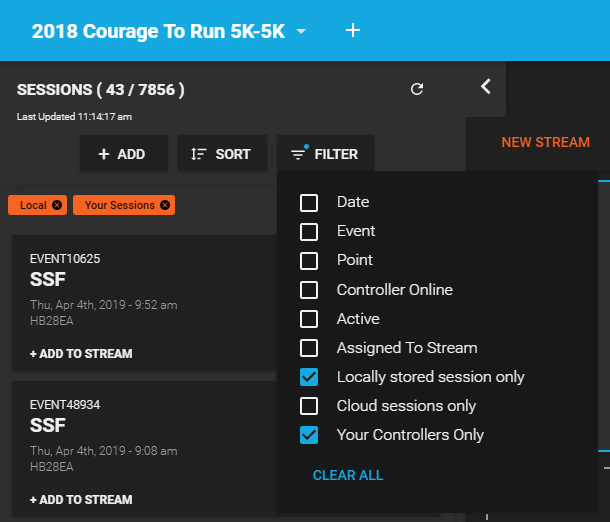
- If you're using Fusion, make sure you've got the "Locally stored sessions only" box checked, then locate the Session and drag and drop it into a Stream.
If you're using CCSLite, confirm that a line exists for the controller which you have connected, then double Click the controller line to open the SimpleClient interface.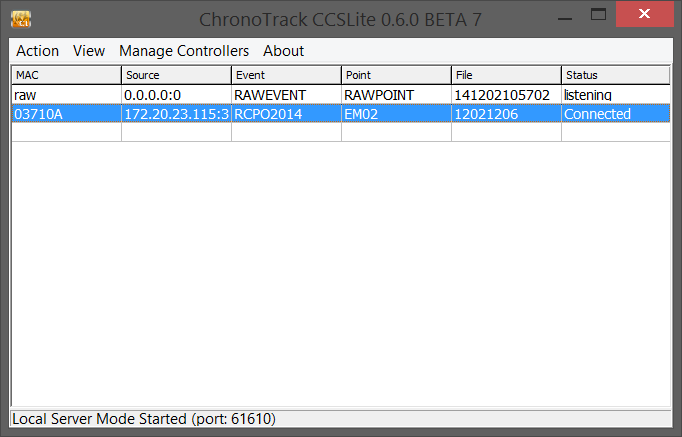
You can now select a session, apply filters to the data, and stream the data to CT Live or other software.
BoxScore 3
- On your computer, open CCSLite.
- Tap the Data Stack button on the upper right corner of the main screen of BoxScore.
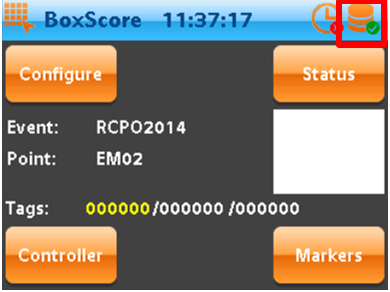
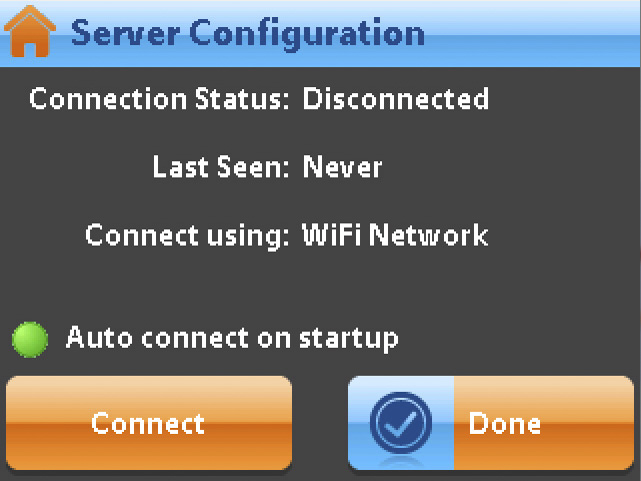
- Tap Connect. You should see the Connection Status change from Disconnected to Connected.
- Click Done.
- If you're using Fusion, make sure you've got the "Locally stored sessions only" box checked, then locate the Session and drag and drop it into a Stream.
If you're using CCSLite, confirm that a line exists for the controller which you have connected, then double Click the controller line to open the SimpleClient interface.
If you do not see “WiFi Network” as the Connect Using option, you must select the radio button next to the WiFi server address.
You can now select a session, apply filters to the data, and stream the data to CT Live or other software.
General Troubleshooting
If you are experiencing difficulty establishing a connection, you may be able to resolve connectivity issues by checking the following:
- Ensure that the server IP Address you entered under Configure > Network matches that assigned to your Network Adapter (see the Configure Your PC section).
- If using BoxScore 3, ensure that the connection method you are using (LAN, WiFi, Cellular) is the selected Server mode.
- Attempt to ping the Controller, to determine that the Controller is discoverable by your PC.
To Do This:
- Click Start and type cmd in the search box. Press the Enter key. The Command window will open.
- Type ping followed by a space and the IP Address assigned to your controller (which can be found on the label on your Controller’s case.

If the ping yields no response, please review the Configure Your PC section.
It is also possible that your firewall is not allowing connections to CCSLite. Refer to Add a Firewall Exception for CCSLite for directions on adding an exception.