Introduction
The Pro 400 and Pro 800 controllers are no longer in production. The new Pro2 controller is now available for purchase. You can check out the Intro article for the Pro2 HERE.
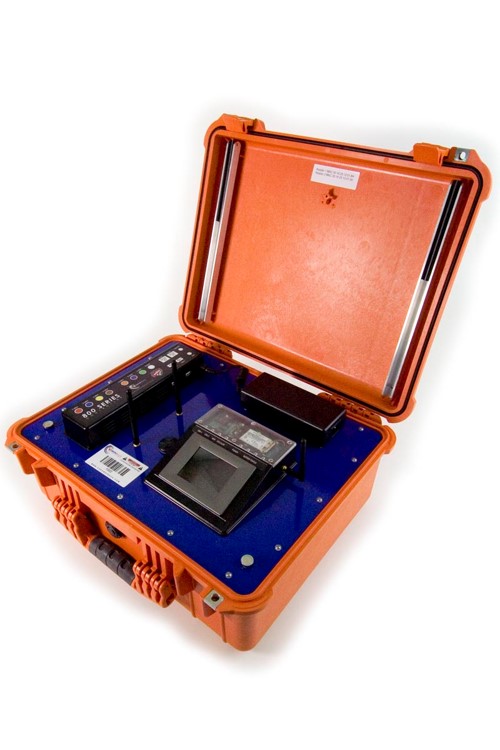
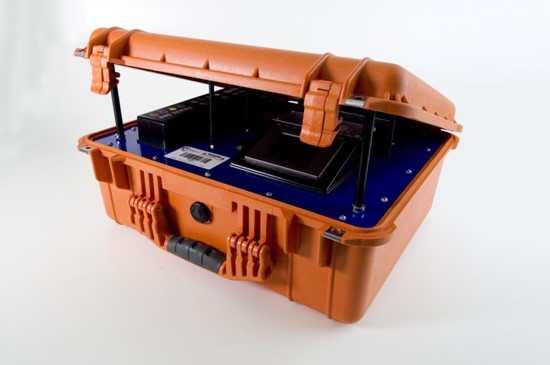
The Pro Series Controller is the first Controller mass-produced by ChronoTrack. It is encased in a rugged Pelican case and features a touch screen display, two-port Ethernet switch, built-in WiFi modem, built-in GPRS (Cellular) Modem, two powered USB ports, internal battery power, auxiliary power port, and AC power.
The Pro Controller comes in two versions: the 800 and the 400. The only difference between the two is that the 800 has two Readers, allowing it to support lines up to 28 feet with 8 gators. The Pro 800 weighs in at about 30 pounds, and the 400 weighs about 26 pounds.
The Basics
The Controller has several primary and secondary interface areas. These are listed below with a legend for visual reference.
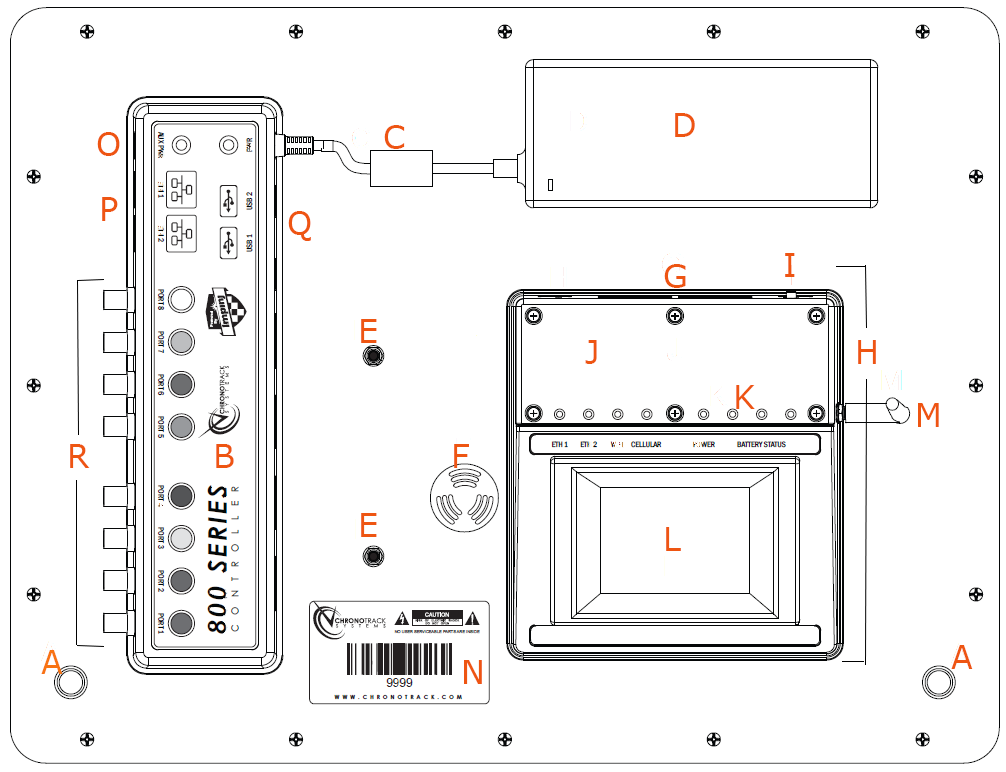
A. Lid Support Magnets - magnetize the lid props to prevent the lid from slamming on cables.
B. Connection Mesa - contains the USB, Ethernet, Auxiliary Power, and Antenna Ports
C. AC Power Pigtail - connects the Power brick to the Controller
D. Power Brick - regulates the power entering the controller via a connected IEC cable.
E. Wi-Fi Antennas - broadcast the Controller's network and allow connection to external networks.
F. Beeper/Volume Modulator - a physical knob that is used to control the volume of the bepper.
G. Controller Vent - provides air ventilation to keep the internal components cool
H. TPC Mesa - contains the TPC, power button, controller vent, GPRS modem, and GPRS antenna
I. Power Switch - used to turn the controller on or off
J. Com Board cover - a removable plastic cover that allows installation of a SIM card
K. Status Indicator LEDs - indicate status changes and problems with multiple colors
L. TPC (Touch Panel Computer) - the control interface of the controller
M. Cellular Antenna (GPRS) - allows the GPRS modem to detect and connect to wireless networks
N. Serial Number Sticker
0. Auxilliary Power Port - used to provide auxiliary power to the controller
P. Ethernet Ports - used to 'network' controllers together or 'stream' timing data to a computer
Q. USB Ports - used to power external devices or transfer timing data to a USB flash drive
R. Reader Ports - used to connect the cables between the Controller and Antennas
When a controller is powered ON, LEDs on the Display Mesa light up depending on the controller's status/activity. The LEDs are described in the following table.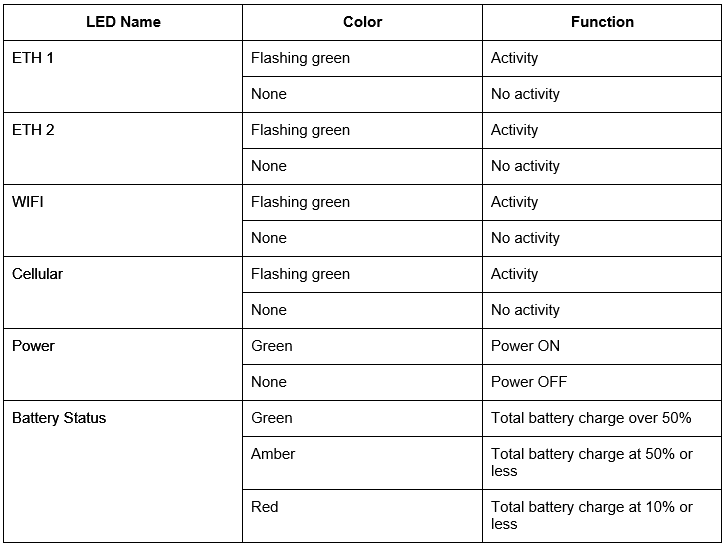
Power
Every Pro Controller has up to three different sources of power - AC Power, Auxiliary Power, and internal Lithium Batteries. with seamless transfer between the power sources so that the controller does not power off until all power sources are exhausted. The Controller's power board manages connected power in a hierarchy to use the most to least dependable power source: Primary AC Power > Auxiliary Power > Internal Battery Power.
Primary AC Power
The AC power brick is mounted to the Controller's blue base plate near the top right corner of the controller. The power brick is connected to the rest of the controller by a short pigtail cable that connects to the Connection Mesa. Power is supplied to the Power Brick by the IEC cable that comes with the Controller.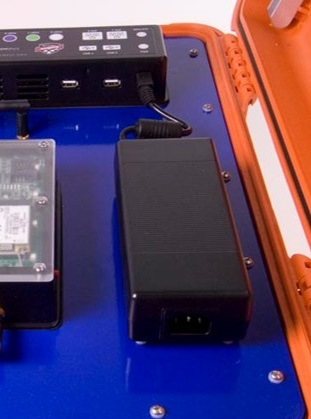
Auxiliary Power
An auxiliary power cable can be purchased from ChronoTrack to provide your Controller with power from a car battery between 12 and 30 volts.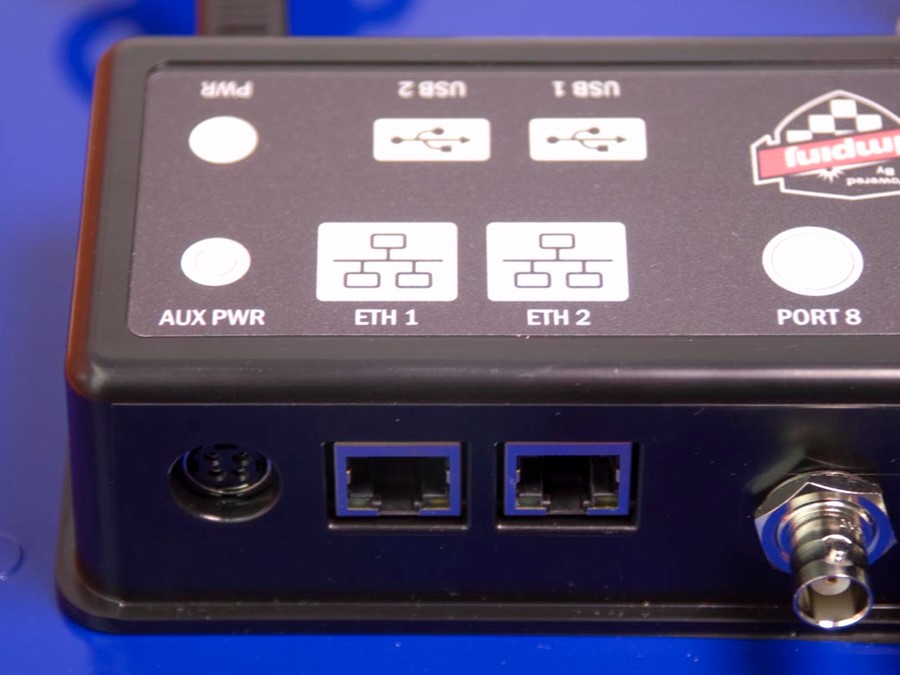
Internal Battery Power
Each Pro Series Controller comes with 4 internal lithium ion batteries which allow it to run for up to 8 hours on a full charge. Up to 2 more batteries can be purchased when you originally purchase the Controller or at a later time.
If additional batteries are purchased later, the Controller must be sent in to ChronoTrack for the installation.
When the Controller is plugged into Primary AC Power and turned on, the internal batteries will charge. The level of charge on the batteries can be approximated using the battery status LED on the TPC mesa or viewed specifically through BoxScore.
TPC and BoxScore
The Pro Series Controller's TPC interface uses a custom program produced by ChronoTrack called BoxScore. There are currently two versions: BoxScore 1.26 and BoxScore 3. BoxScore is used to control all aspects of the Controller's settings.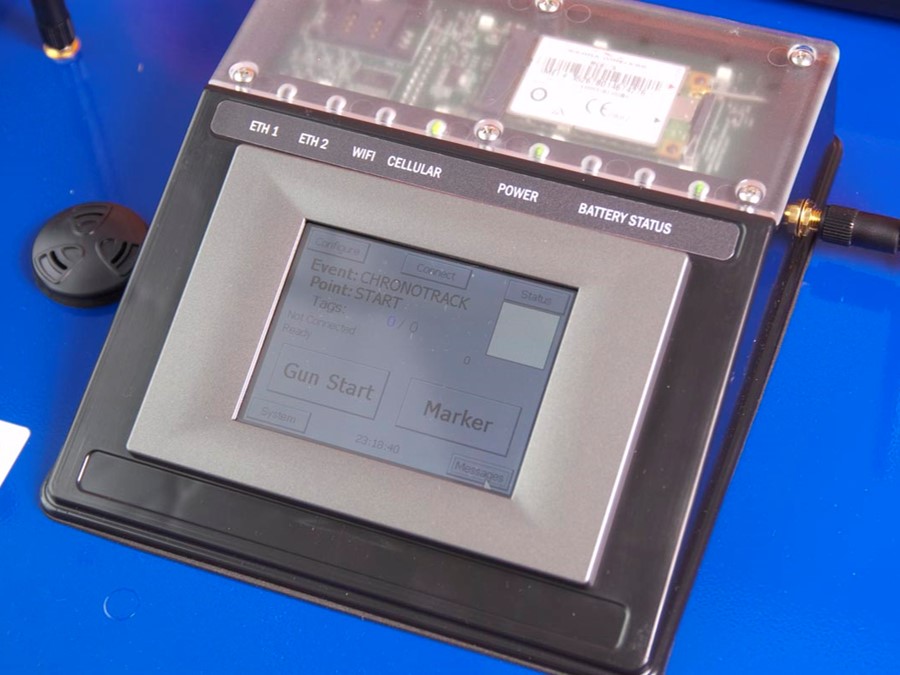
Readers and Antenna Ports
Inside every Pro 800 Controller are two Readers (Pro 400s have one reader). Readers are the heart of the Controller. The readers push the RFID signal from any connected Gators or Flash Points to collect tag data and then store the tag data on Race Day. Collected tag data is stored on the Touch Panel Computer (TPC) as well, and any collected data will be available for 2 weeks after collection.
Each Reader has 4 Antenna ports. This means that one Reader can support up to 14 feet of timing line or 28 feet per Pro Controller.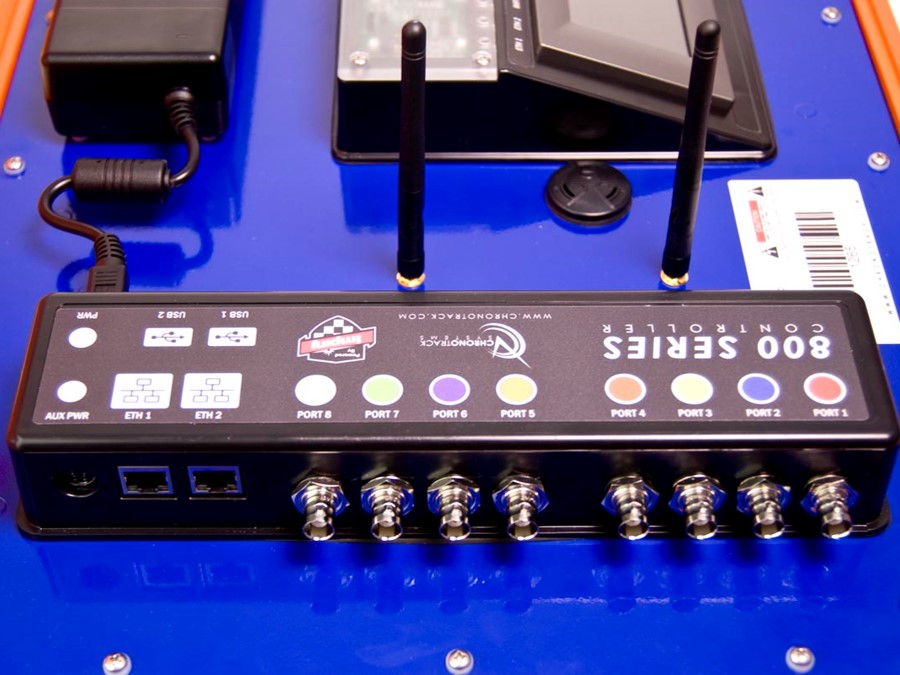
It is not necessary to use every port on a Reader. If necessary, you could use only one Antenna.
For more on Antennas and Tags, click HERE.
Cables
Pro 800 Controllers must have a short Cable set to connect the first four Gators and a Long cable set for the second four for a continuous, 28 foot line. With two Pro controllers at either end of a line with 8 Gators apiece connected, you could have 56 feet of unbroken timing line.


Short Cable sets are color coded with Red, Blue, Yellow, and Brown (shortest to longest). Long Cable sets are color coded with Orange, Purple, Green, and White (shortest to longest). These colors correspond to the colors printed above each port on top of the Connection Mesa, pictured below.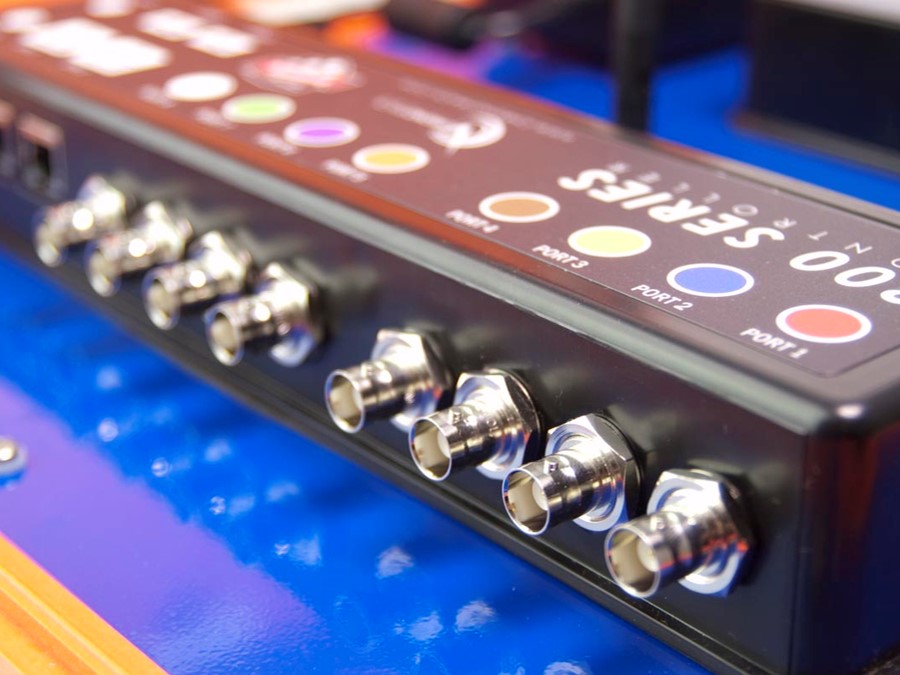
USB Ports
Each Pro Controller has two powered USB ports that can be used to power external devices such as mobile routers and to transfer timing data to a USB drive so that it can be processed on a Computer (for more on processing flash drive data, click HERE).
Most updates to the software or firmware for the Controller's various components will also be carried out via a USB flash drive.
The Controller only supports USB 1.0 drives up to 2GB. We highly recommend testing USB drives prior to race day to ensure that they work well with the Controller.
Ethernet Ports
As noted in the Introduction, each Pro Controller has a two-port Ethernet switch. The ports are located on the end of the Connection Meda closest to the lid. This allows multiple Pro Controllers to be networked together and share data. Tag data collected by one Pro controller will be stored on that Controller and also any networked Pro Controllers. Other data such as Time Syncs will be shared between networked Controllers.
You can also connect a Pro Controller to a Windows or Linux computer and 'stream' the data from the Controller to the computer using a program called CCS Lite and then process it through SimpleClient. You can also sync the time on the Controller from your laptop in this manner as well.
WiFi
The internal WiFi modem in the Controller is programmed with an Ad-Hoc network that allows any other Pro Controllers in range to wirelessly share time syncs, Gun Starts, and Markers without any configuration (by you). Timing Data cannot be passed between Controllers via WiFi, but you may connect a Pro to a computer via WiFi to stream and process data through CCS Lite and SimpleClient.
The only exception to reads being shared via WiFi are reads entered using a USB keyboard (BoxScore 3). These reads WILL be shared over WiFi.
There are two WiFi antennas between the TPC and Connection Mesas. These antennas will fold down to permit the lid to close, but can be broken if the lid is closed without bending the antennas down first.
GPRS (Cellular) Modem
The built-in GPRS modem allows you to insert a SIM card into the Controller and stream timing data to the ChronoTrack CCS Server. You must purchase a Data Only plan from a GSM cellular provider.
Major GSM cellular providers in the US include AT&T and T-Mobile.
Bear in mind that once you have selected a carrier, purchased a plan, and installed the SIM card, there is some additional configuration that must be done through BoxScore's Modem Manager.
The GPRS modem is connected to an antenna that protrudes from the side of the TPC Mesa. The SIM card is inserted by removing the clear plastic cover from the top of the TPC mesa and sliding it into its tray.