Introduction
A Stream is the package containing Session data (tag data within a controller session) and the settings and filters applied to that data that will be sent to the Host. You can add many different Streams and apply a variety of filters and changes to the data being sent with each Stream. Once you have connected a controller to the ChronoTrack Server, you can select the data session from the controller and stream it to CT Live.
Before you begin:
- Ensure you have added the correct ChronoTrack Host to StreamManager
- Ensure that your Controller is connected to the CCS Server (See instructions for ChronOS, BoxScore 3, BoxScore 1.26, or MiniTrack)
- Verify the Event name of your controller. You will need this to locate your Controller in StreamManager.
- For ChronOS, the Event Name can be viewed on the main screen.
- For any version of BoxScore, the Event name can be viewed on the main screen.
- For MiniTracks running firmware 5.3.8 or lower, you can view the Event name by pressing Menu > 1 > 1 and using the Down arrow key until you see EVENT: MINIXXXXXYYYYYY. The Xs will be your controller Sereal number. The Ys will be the date the controller was last powered on in YYMMDD format. - Ensure that Timing Points, Timing Devices, and Intervals are set correctly to receive and process data in CT Live.
1. Select a Session
- Log into the Timer Portal and click the StreamManager tab.
- Click Add Stream

- In the Add Streams Utility window, all the controllers you have access to, listed by their Event names, will be displayed as Event Selection Panes. If you don't immediately see the Event name of the controller you want to select, you can use the Event Filter to search for it. If you're using a different timer's controllers, you can click Show All Events to see sessions from controllers not assigned to your company.

- Once you have located the correct Event name, click it to select it.

- Once you have selected the Event, you can select the Point.
- Each available Point will display the point name and the number of sessions that are available to select from. - Once you select a Point, you must select a tag mode Type, whether Normal, Immediate, or Keypad.

- Next, select a Session. Usually, you will be looking for the session that displays Online/Open as its status.
- Once you have selected the Session, you must select the Host to which the data will be streamed.

- Next you will Finalize the session selection by choosing Save & Start or Save Only. Unless the you named your Event and Point to what they would need to be to stream the data to your CT Live Event, you should select Save Only.
- Once you have selected Save & Start or Save Only, the stream will be created, and you can close the Add Stream Utility. You should see a confirmation like this:

After closing the Add Stream Utility, you will see your stream appear like so:
2. Rename Event and Point
In order for the data to be Streamed to the correct CT Live Event and Point, you must rename the Event and Point of the stream unless you configured the Event Name and Point Name on the controller to match what CT Live.
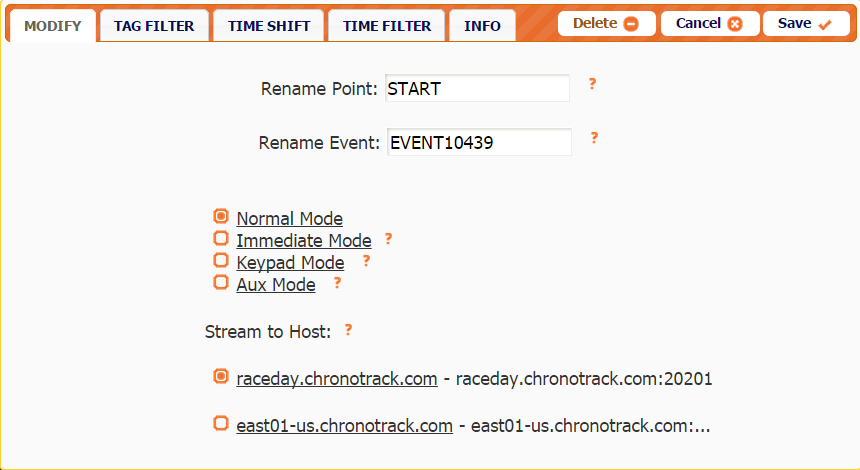
- Click on the Stream. The pane that appears should be on the Modify tab.

- Click inside the Rename Point text box, and enter the Point name you would like to stream the data to. The Point Name should correspond to the Timing Device name within CT Live that the data should be sent to.

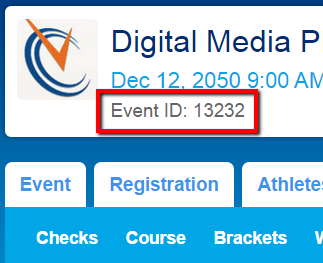
- Now edit the Event Name to EVENTXXXXX where the Xs are your Event ID number (this is located in the upper left corner of your CT Live event) Make sure caps lock is on when you type EVENT.

- Click Save to finalize the Event and Point name changes.
3. Apply Filters
If there are any Filters or Adjustments you would like to apply to the stream such as Tag Ranges or Time Shifts, do so now. (For more on these filters, click HERE) Remember to click Save to finalize changes.
Repeat the Select, Rename, Apply Filters process above for each controller session you need to add.
4. Start the Streams
Once you have changed the Event and Point name and applied any Filters and Adjustments for all Streams, click the Start button next to each stream to begin processing and sending data to CT Live.
You should see a green bar appear with lines that move across. This indicates that data is being sent.
If you click Start and you see ERROR in the Status column, double-check that the Event and Point names for the Stream are correct and that Timing Devices have been added to your Course in CT Live.

To verify that tags are being streamed correctly, check the Auto-Score pane in your event. It should show tags in the 'queue' to be processed as shown below. 