General Overview

The Pro2 controller is the successor to the original Pro controller. As with the original Pro, the Pro2 is encased in a rugged Pelican case and features a touch screen display, two-port Ethernet switch, built-in WiFi modem, built-in GPRS (Cellular) Modem, three powered USB ports, and AC power.
In addition to the features of the original Pro, the Pro2 has built-in GPI (General Purpose Input), GPS time syncing, Active Extension support, an LED marquee display, and support for up to 5 hot-swappable Ryobi batteries instead of built-in batteries. The Pro2 also features a greatly-improved interface called ChronOS.
The Pro2 has two Readers, allowing it to support lines up to 28 feet (8 meters for non US gators) with 8 gators. The Pro2 weighs in at about 30 pounds (13.6 kilograms) with batteries installed.
This guide will give a general overview of the features, abilities, and functions of the Pro2 controller's hardware and software components.
Physical Overview
Below is an image of the Pro2 with the main areas and components labeled. We'll discuss each major area in more detail later.

- A - Head Unit - contains all essential controller components except for the readers and batteries.
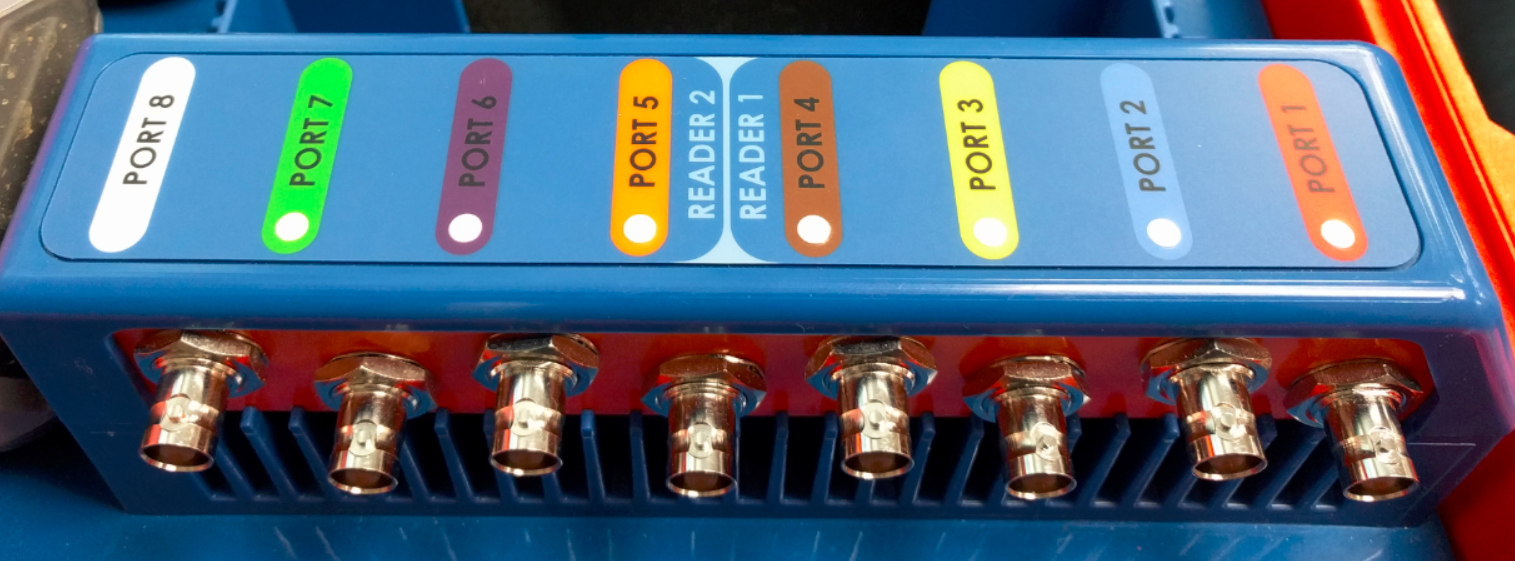
- B - Port Mesa - contains the 8 ports for antennas. Each port has a color-coded bar with an LED that lights when an antenna is connected to the port.
- C - Storage bin - offers a space to store items such as routers, shower caps, or other accessories.
- D - Batteries - the controller supports up to 5 Ryobi batteries (not included) - 4 on top and 1 internal. The Pro2 will charge the Ryobi batteries when plugged in and powered on. (Keep reading for more on batteries)
- E - Power Brick Cradle - offers a place to set the controller's power brick to keep it protected and out of the way.
- F - Thumb Screws - the four screws at each corner of the blue deck plate can be removed to access the underside of the controller.
- G - LED Marquee Display - an LED display that can be used to display a variety of information.
- H - Touch Display - used to access the controller's settings and functions. The controller runs a locked version of Linux and uses a program called ChronOS to control all settings and functions on the Pro2.
- I - Keypad - can be used to enter numbers and text on the screen and enter command functions.
Head Unit
As noted before, the Head Unit of the Pro2 contains almost all the essential components of the controller. The Head Unit can be easily removed from the controller and replaced with a new Head Unit in case of emergencies. This means that if a display gets damaged, for example, you can swap in a different Head Unit and ship the damaged one to ChronoTrack for repair while still being able to use the controller. If this ever becomes necessary, we have a guide that explains how to remove the Head Unit HERE.
Now, let's take a closer look at the Head Unit.

- A - Keypad - the F keys can be used to select any of the 4 main menus without touching the screen. Any sub-menus will need to be selected with the touch screen. The number/letter keys can currently only be used to enter text and numbers on the screen when a text box has been activated.
- B - Battery Indicators - these LEDs can be used to view which batteries are ready, in use, and charging. Batteries are drained serially from A to E. As batteries are depleted, the controller will beep with an alert, notifying you. Batteries are hot-swappable, meaning that they can be removed and replaced with fresh batteries, even when in use.
- C and D - These icons indicate the side-panel features directly beneath them, but have no function of their own.
Right Side Panel
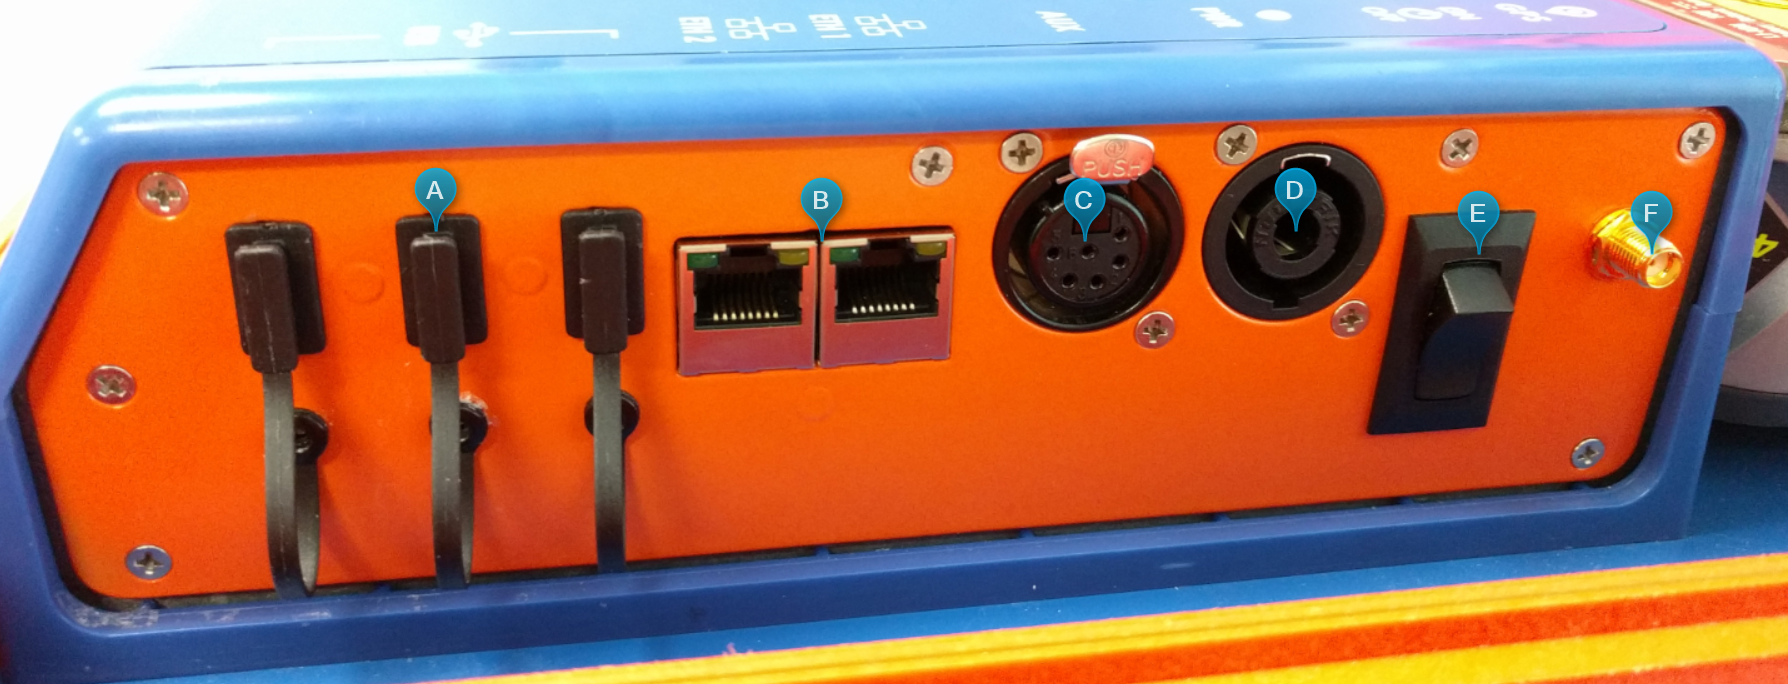
The right side of the Head Unit contains the majority of the non-UHF ports.

- A - USB Ports - Each of the 3 USB ports has a rubber port protector for when the ports are not in use. Ports can be used to transfer timing data to a USB drive and power external routers or other components. All updates to the Controller's software or firmware are installed from a USB flash drive.
- B - Ethernet Ports - The two-port ethernet switch in the Pro2 allows data to be passed from the controller to a PC or to send and receive tag reads and time syncs. A Pro or Pro2 will automatically send its collected reads to any connected Pro/Pro2 controllers and store all incoming data as well.
- C - Active Extension Port - the Pro2 comes with the ability to support the Active extension. The Active extension must still be purchased separately. For more on the Active extension, click HERE.
- D - AC Power Port - Unlike the Pro, the Pro2's power port has a locking 2-pole cable mount. The cable is inserted and then twisted to lock it in place. To remove the power cable, the silver switch must be pushed away from the Head Unit and the port must be twisted to the left to be removed.
- E - Power Switch - To power the controller on, this spring-loaded switch must be held down for one second to power the controller on. To power the controller off, you can hold the button down for 5 seconds. You can also power the controller off using the display. Tapping the button quickly will initiate battery charging when the controller is powered down.
- GPS Antenna Port - The Pro2 controller has built-in GPS so you can pull time syncs based on satellite triangulation. For more on this, click HERE.
Left Side Panel
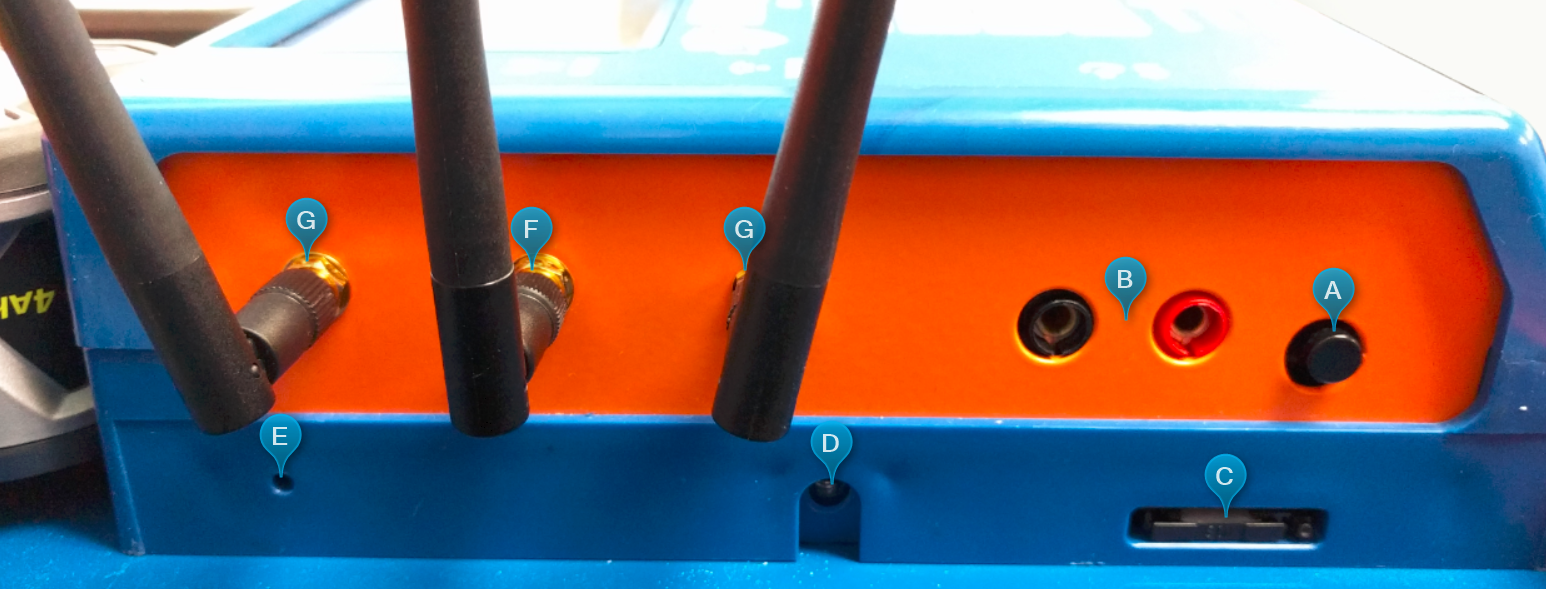
The left side panel holds the physical Gun Start button, the SIM slot, the GPI ports, Head Unit retention screw, and the WiFi and Cellular antennas.

- A - Gun Start Button - this button will immediately create a Gun Start marker when pressed.
- B - GPI Ports - the Pro2 controller controller comes with built-in support for general purpose input devices such as Alge start gates and beam break systems. Currently, the only supported GPI input type is Gun Starts.
- C - SIM Tray - this tray can be ejected to insert a SIM card into the controller so that it can connect to the ChronoTrack server. The SIM should be a full-size SIM or have an adapter if it is mini, micro, or nano size. The SIM must be active on data-only plan, and some software configuration is necessary. For more on this, click HERE.
- D - Head Unit Retention Screw - This screw can be removed to allow the Head Unit to be completely removed from the controller in order to be shipped for repair.
- E - Hard Reset Button - this button will instantly reboot the controller. Do not use this button unless instructed to by ChronoTrack Support personnel.
- F - Cellular Antenna - This antenna allows the controller to connect to cellular networks if there is an enabled SIM inserted in the SIM tray.
- G - WiFi Antennas - These antennas can be used to connect the controller to WiFi networks. By default, every Pro and Pro2 controller is joined to an Ad-hoc WiFi network that allows the controllers to wirelessly communicate time syncs if the WiFi modem is powered on.
UHF Port Mesa
Inside every Pro2 Controller are two Readers. The readers generate the RFID signal and broadcast it from any connected Gators or Flash Points to collect and store tag reads on the Pro2. Collected tag data is stored on an internal storage drive as well, and any collected data will be available for 2 weeks after collection.
Each Reader has 4 Antenna ports. This means that one Reader can support up to 14 feet of timing line or 28 feet per Pro Controller. (4/8 meters for non-US gators).
The UHF port mesa contains all 8 ports from both readers. The ports are staggered to make it a bit easier to connect the cables to the controller. The ports are BNC connectors, so the cable plugs have to be inserted with the channel over the pin on the port, then twisted to lock them into place. When a cable is inserted and the controller is powered on, the LED above the port will light, indicating that the connection is stable. You can also view the status of each port in the ChronOS software.
For more on ChronoTrack Antennas and Tags, click HERE.

Batteries
The Pro2 operates using AC power or Ryobi Lithium power tool batteries. The Pro2 does not come with the batteries, but these can be purchased from Home Depot or online for about $100 for 2 batteries 4Ah batteries. The latest battery version is the P197 model. Larger capacity batteries such as the 6Ah P193 will also work with the controller*.
*After the release of the P193, we introduced a physical upgrade to the Pro2 powerboard to allow support for these and other high-capacity batteries. If you want to use a battery larger than 4Ah, please refer to the Battery FAQ HERE to determine if your controller is already compatible.
What's Next?